
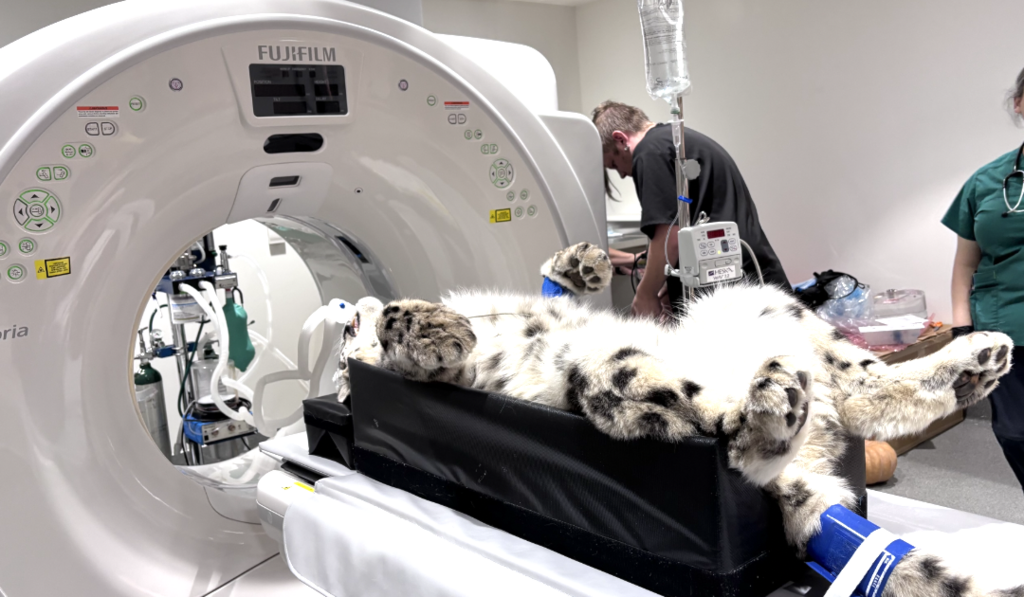
Welcome to your basic veterinary CT guide. This manual outlines the foundational principles of patient preparation, positioning, technical parameters, and housekeeping to help your team produce the highest diagnostic-quality scans right from the start.
Veterinary CT Guide
Welcome to your basic veterinary CT guide. This manual outlines the foundational principles of patient preparation, positioning, technical parameters, and housekeeping to help your team produce diagnostic-quality scans right from the start.
1. Essential Complementary Equipment
To fully complement your new CT setup and maximise its diagnostic capabilities, ensure your scanning room is equipped with the following:
- Contrast Medium Iohexol for contrast-enhanced studies.
- Patient Support An anaesthesia ventilator for controlled breath-holding techniques.
- Advanced Delivery A pressure injector for precise contrast delivery.
- Positioning Toolkit A dedicated set of foam cushions, V-shaped troughs, and strapping materials.
2. Patient Preparation & Pre-Scan Checklist
A successful CT scan begins long before the X-ray tube starts rotating.
Prevent Atelectasis
If a patient is premedicated or sedated prior to a thoracic scan, avoid letting them rest in lateral recumbency for the 30 minutes leading up to the procedure.
Lateral recumbency causes rapid lung hypostasis and atelectasis, which can easily mask or mimic thoracic pathology. Induce the patient directly inside the CT room to minimise pre-acquisition anaesthesia time.
Prioritise the Workflow
If the patient requires multiple procedures on the same day, always perform the CT scan first whenever possible.
Verify Clinical History & Patient Details
Double-check clinical histories to avoid missing targeted lesions. For example, ensure that a staging scan extends far enough caudally to capture a known rectal mass.
Enter all patient details accurately. This is especially important if the case is being submitted to an external specialist.
Anaesthesia vs. Deep Sedation
The patient must remain completely immobile during and between scan series.
If a patient is clinically unstable, carefully evaluate whether the CT scan should be postponed.
Optimise IV Access
Place the largest IV catheter you can safely manage to facilitate rapid contrast delivery.
- Large and giant breeds: Use an 18-gauge catheter.
- Small and medium breeds: Use a 20-gauge catheter.
- Strict rule: Avoid 24-gauge catheters entirely.
Inject straight into the catheter port whenever possible. Standard extension sets slow down the injection speed.
If an extension is required, use a large-bore extension line and flush immediately with saline or Ringer’s solution.
3. Positioning Aids & Room Etiquette
Proper positioning ensures that your patient is stable, aligned, and centred within the gantry.
Approved Materials Only
Use only foam cushions and fabric fasteners or strapping materials.
The Sponge Hack
Purchase a family pack of standard bath sponges with visible foam bubbles. Wrap them in disposable plastic to protect them from fluids.
They can be stacked to increase height or cut thinner to wedge between joints and beneath the head.
Strapping
Crepe bandages make excellent, cost-effective straps that can be easily washed or replaced.
No Sandbags
Sandbags must never enter the scan field. In multi-user facilities, it is best practice to remove sandbags from the CT room entirely to prevent accidental use.
Foam V-Troughs
Invest in foam V-shaped troughs in at least two sizes.
- Large troughs should have the V extend all the way to the bottom to accommodate the depth of giant-breed dogs.
- Small troughs should not extend all the way to the bottom, helping lift smaller patients towards the gantry isocentre.
- If your troughs have zippers, position them away from the scan field.
- Alternatively, manufacture troughs using hook-and-loop fabric fasteners instead of metal.
Very Small Patients
If the CT table cannot lift a tiny patient high enough to meet the lateral guide light, raise the patient using a firm cushion measuring approximately 25 × 35 × 7 cm.
A clean, plastic-covered cardboard monitor box can also be used as a practical alternative.
4. Patient Positioning Principles
Achieving textbook-straight positioning is essential to avoid structural symmetry confusion on your final images.
The Three Golden Rules of the Gantry
- Parallel Alignment: Y-Axis The anatomical area of interest must be as parallel to the table as possible.
- Isocentre Centring Place the target anatomy as close as possible to the exact centre of the gantry bore, where all three planes of the laser lights cross.
- Lateral Guide Light Adjust the table height so the horizontal lateral laser guide runs precisely through the midpoint of the area being scanned.
Area-Specific Positioning
Clear the Field
The area of interest must be the only object inside the gantry. Remove monitoring cables, IV lines, fluid bags, and tongue sensors from the scan field.
Limbs
Fully extend the limbs. Ensure paired joints are symmetrical and rest at the same level so they can be evaluated within one field of view.
Head
Position the patient in sternal recumbency with the head extended and the hard palate or mandible parallel to the table.
Thorax
Position the patient perfectly straight with zero rotation in sternal recumbency.
Abdomen
Position the patient straight with zero rotation in dorsal recumbency, unless a combined thoracic scan requires sternal positioning.
Thoracolumbar Spine
Always scan in dorsal recumbency to minimise motion artifacts caused by chest-wall expansion during breathing.
5. Protocols, Technical Parameters & FOV
Avoid whole-body scans with large fields of view. Each anatomical area should be treated as an individual study with its own dedicated protocol.
Exposure Baseline Factors
kV
Generally set between 110 kV and 130 kV. For exotic patients, reduce this to approximately 80 kV.
mA / mAs
Adjust manually based on the thickness of the patient and the target density of the anatomical area.
Avoid Automatic Exposure Selection
Avoid automatic exposure selection or Care Dose features. These algorithms were developed for human anatomy and may calculate unsuitable exposures for small animal patients.
Slice Thickness & Pitch
- Slice Thickness Veterinary patients require tight slices of 2 mm or less, depending on their size.
- Increment and Overlap Use a 50% overlap, such as a 2 mm slice with a 1 mm increment, for clean diagnostic multiplanar reconstructions.
- Rotation Time Set a baseline rotation time of approximately one second.
- Pitch Set the pitch to 1, or below 1 for small, high-detail regions such as the tympanic bullae.
Optimising the Field of View
Reduce the acquisition field of view as tightly as possible to include only the exact area of interest.
Running a wide scan and manually cropping the image during post-processing causes a permanent loss of spatial resolution.
When scanning with a small field of view, a wider field of view may still be reconstructed from the raw data later, provided the secondary anatomy remained within the scan beam trajectory.
6. Contrast Medium Best Practices
When in doubt, especially when submitting images to a teleradiology service, always perform a post-contrast series.
Extension Setup
If using an IV extension line, choose a large-bore line measuring approximately 3–4 mm and pre-fill it with contrast.
Calculate the volume needed to prime the line and add this amount to the patient’s total dose, or flush the line completely with saline.
Injection Technique
Gently extend the catheterised limb while injecting manually to prevent the patient from shifting out of alignment.
Product Management
Use non-ionic Iohexol containing 300 or 350 mg I/ml. Because the medium may crystallise around the bottleneck after opening, discard the bottle if crystallisation occurs.
Smaller vial sizes of approximately 20–50 ml are recommended to reduce waste.
Dosing Guidelines
- Dogs, cats, and rabbits: Baseline dose of 2 ml/kg.
- Very large and giant dogs: The dose may be reduced to 1.5 ml/kg.
Injection Speed
- Standard patients: approximately 3 ml per second.
- Patients weighing 5 kg or less: approximately 1.5 ml per second.
Scan Timing
Begin the post-contrast perfusion scan exactly one minute after the contrast injection has been completed.
Renal Safety
Evaluate Renal Risk Carefully
Contrast medium is cleared renally and may contribute to acute kidney injury.
Patients with borderline renal values, diabetes, or congestive heart failure may require appropriate IV fluid support before, during, and after the CT scan.
If the risk outweighs the expected benefit, consider a pre-contrast study only while accounting for the resulting diagnostic limitations.
7. Breath-Hold Techniques
Respiratory motion creates severe blurring in the cranial abdomen, thorax, and thoracolumbar spine.
To minimise motion, aim to reduce the respiratory rate to approximately six to eight breaths per minute or fewer.
- Deepen the Anaesthetic Plane Only when clinically safe and appropriate.
- Titrated Propofol A small, carefully titrated dose may be used to induce temporary apnoea.
- Pre-Hyperventilation Hyperventilate the patient immediately before scanning.
- Mechanical Ventilation Temporarily pause respiration. Hold at inspiration for thoracic CT and at expiration for abdominal CT.
Direction of Scan
For thoracic scans using hyperventilation or apnoea, and for abdominal scans extending towards the hips, begin the scan at the diaphragm and move away from it.
By the time the patient takes an involuntary breath, the scan should have cleared the diaphragm, where the strongest respiratory motion usually occurs.
8. Reconstructions for Teleradiology
When submitting cases for specialist review, send transverse or axial images only and ensure the exported series follow consistent parameter rules.
Series 1: Pre-Contrast / Survey
- Reconstruction A Use a soft-to-medium algorithm optimised for soft tissue evaluation.
- Reconstruction B Use a sharp algorithm for bone and osteo detail. For thoracic scans, use a dedicated lung algorithm instead.
Series 2: Post-Contrast
The post-contrast series must be an exact duplicate of the pre-contrast parameters, including identical slice thickness, field of view, and 50% overlap.
- Reconstruction C Soft-to-medium algorithm for soft tissue evaluation.
- Reconstruction D Sharp bone or osteo algorithm. Export this only for non-IV contrast studies such as CT myelograms or contrast ureterograms.
9. CT Room Housekeeping & Artifact Prevention
Metal Artifacts
Metal implants can create severe streaking artifacts that destroy image detail.
If scanning a joint containing metal implants, increase the slice thickness to approximately 2–2.5 mm to reduce the streak effect.
If the artifact remains too severe, consider multi-angle digital radiographs instead.
Database Maintenance
Regularly remove old patient files from the CT system’s local hard drive and transfer archived cases to a secure cloud-based PACS or external storage system.
Contrast Cleanup
Contrast medium is sticky and highly radiopaque. Clean spills immediately.
Frequently wipe the inside of the gantry bore and the patient table with a moist cloth. Dried contrast on these surfaces can create recurring artifacts in future scans.
Positioning Aid Care
Foam cushions can absorb spilled contrast over time. Wash covers and positioning aids regularly to prevent hidden residues from causing artifacts.
Conclusion
Consistent preparation, precise positioning, appropriate CT protocols, and careful contrast management are fundamental to high-quality veterinary CT imaging.
A structured workflow not only improves diagnostic image quality but also supports faster, more reliable specialist interpretation when cases are submitted for teleradiology review.
Start today Book your demo
Smarter Teleradiology. Faster Diagnosis. Better Results.
Imaging guides on this topic
Browse all imaging guides
CT of the canine nasal cavity for chronic nasal disease
How CT separates nasal tumours, fungal rhinitis, foreign bodies and inflammatory rhinitis in dogs with chronic nasal discharge, and where rhinoscopy and biopsy are still needed.
CT of the feline nasal cavity for chronic nasal disease
Which CT features separate nasal lymphoma, carcinoma, fungal and chronic rhinitis in cats, why the retropharyngeal nodes matter, and why biopsy is still needed.
CT of the feline nasopharynx for stertor
What CT shows in nasopharyngeal polyps, stenosis, lymphoma and cryptococcosis in cats with stertor, and when endoscopy and biopsy are still needed.